


Preparing beam surfaces and choosing the right adhesives are crucial for successful Glue Laminated Beam (GLT) installation. Proper alignment ensures structural integrity using tools like straight edges, levels, and laser measures. Even adhesive application with caulk guns or brushes promotes strong bonds, surpassing nailing methods. Refer to the Glue Laminated Beam Installation Guide for expert advice.
Ensuring precise beam alignment during gluing is paramount for successful glue laminated beam installation. This comprehensive guide offers practical tips for achieving flawless results. From thoroughly preparing beam surfaces to selecting the right glue, implementing accurate measurement techniques, visualizing alignment with basic tools, and applying glue evenly, each step ensures structural integrity. Post-application verification seals the deal, guaranteeing optimal joint strength. Follow this Glue Laminated Beam Installation Guide for precise, lasting connections.
- Prepare Beam Surfaces Thoroughly
- Choose Suitable Glue for Laminated Beams
- Implement Proper Measurement Techniques
- Visualize Alignment Using Basic Tools
- Apply Glue Equally Across Joins
- Verify Alignment Post-Glue Application
Prepare Beam Surfaces Thoroughly
Before proceeding with the gluing process, ensuring that beam surfaces are thoroughly prepared is paramount for achieving precise alignment and a robust bond. This involves meticulously cleaning both beams and the installation area to eliminate any debris, dust, or contaminants that could impede adhesion. Additionally, inspecting for defects, such as cracks or irregularities, on the beam surfaces is crucial. Any damages should be addressed through repairs or replacements to guarantee a solid foundation for gluing.
For GLT (Glue Laminated Timber) installations, selecting the appropriate adhesive tailored to timber structures is essential. Adhesives designed specifically for heavy timber applications offer superior strength and longevity, ensuring a secure bond between beams. Moreover, attending GLT installation workshops for professionals can equip you with the knowledge and skills to master beam alignment and gluing techniques. Visit us at 18 Clifton St, Unadilla, NY 13849 anytime to learn more about these workshops or for assistance in repairing damaged GLT structures.
Choose Suitable Glue for Laminated Beams

When it comes to gluing laminated beams, choosing the right glue is paramount for precise alignment and structural integrity. In a comprehensive glue laminated beam installation guide, experts emphasize the significance of selecting an adhesive tailored for this specific application. Look for high-performance glues designed to withstand the unique stresses and requirements of GLT (glued laminar timber) construction. These specialized adhesives offer superior bonding strength, ensuring that your beams remain perfectly aligned during and after installation, which is crucial for structural stability.
In addition to structural considerations, selecting the right adhesive for beams aligns with building code requirements for GLT. Many jurisdictions mandate specific types of glue, ensuring safety and durability. Furthermore, gluing offers distinct advantages over traditional nailing methods, including minimal disruption to the timber’s internal structure, reduced installation noise, and a smoother overall finish. To learn more about best practices for glue laminated beam installation, visit us at unalam.com for comprehensive guidance tailored by experts in the field.
Implement Proper Measurement Techniques

When it comes to ensuring precise beam alignment during gluing, implementing proper measurement techniques is paramount. For a successful glue laminated beam installation guide, start by utilizing advanced tools like laser measurements and digital calipers. These instruments provide accurate dimensions, enabling you to detect even minor discrepancies that could impact structural integrity. Online resources for laminated beam construction offer detailed insights on the latest measurement methodologies, enhancing your precision.
Moreover, consider the role of safe gluing methods for beams. Adhering to recommended guidelines from industry experts will not only enhance accuracy but also ensure a robust bond between wood elements. Remember, incorrect alignment can lead to structural weaknesses and long-term instability. So, whether you’re learning how to install laminated wood beams or seeking guidance on safe gluing practices, refer to reputable sources and consult professionals. Give us a call at (607) 369-9341 for personalized assistance.
Visualize Alignment Using Basic Tools

Visualizing alignment is a crucial step in the Glue Laminated Beam (GLT) installation process, ensuring the longevity and structural integrity of your project. Basic tools like straight edges, levels, and laser measures are invaluable for this task. Start by setting up your work area with these tools to ensure accuracy from the outset. A straight edge along with a level will help you verify that your beams are parallel and in line with each other, while a laser measure provides precise distance readings, enabling you to maintain exact alignment during the gluing process.
For those looking for a detailed guide on GLT installation, considering visiting us at 18 Clifton St, Unadilla, NY 13849 anytime. Our workshops are designed specifically for professionals seeking to master the art of gluing laminated timber, addressing topics such as adhesive application and fix broken laminated beam connections. These sessions equip you with the skills needed to achieve impeccable beam alignment, a key factor in ensuring the overall quality and durability of your glued laminated beam installations.
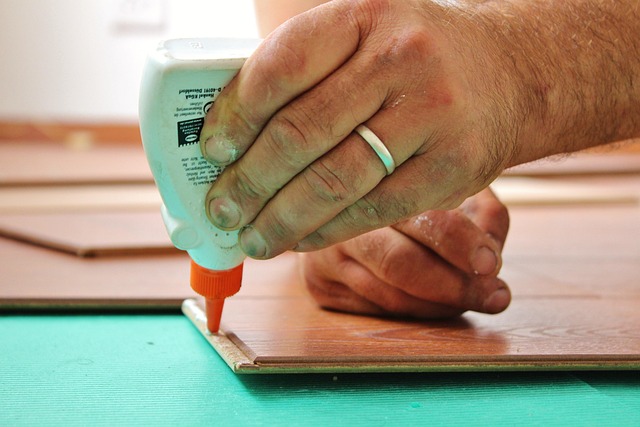
Apply Glue Equally Across Joins

For precise beam alignment during gluing, an even application of glue across all joins is crucial in achieving strong bonding. This involves ensuring every surface that comes into contact with another beam is coated uniformly with adhesive. A Glue Laminated Beam Installation Guide recommends using a caulk gun or a glue brush to apply the adhesive, focusing on seams where two beams meet. Even distribution guarantees consistent pressure between joints, leading to superior bonding strength of GLT (glue laminated timber) compared to nailing.
The advantages of gluing over nailing in laminated beam construction are evident. It offers greater precision, resulting in more robust connections. Moreover, adhesive bonds can withstand higher loads and provide better long-term performance, making gluing a preferred method for many professionals. If you’re considering GLT or need guidance on any stage of the installation process, give us a call at (607) 369-9341 for expert advice tailored to your laminated beam construction guide needs.
Verify Alignment Post-Glue Application

After applying the glue and assembling the laminated beam, it’s crucial to verify the alignment to ensure structural integrity. Check for any gaps or misalignments between the lamina and the beam’s surface. A precise fit is essential for the long-term stability of your glued laminated beam installation guide. Use a level and measuring tape to confirm that the beam is straight and securely fastened at all joints.
Regularly inspecting the alignment post-glue application ensures that you catch any issues early. This step is particularly vital in suitable projects for laminated timber where cost-effective glued laminated beam solutions offer advantages over nailing, promoting stronger bonds and more seamless constructions. If discrepancies are found, take corrective actions immediately to prevent future problems. For expert guidance on how to install laminated wood beams, don’t hesitate to give us a call at (607) 369-9341.
When gluing laminated beams, precise beam alignment is key for a successful installation. By thoroughly preparing beam surfaces, selecting the right glue, utilizing accurate measurement techniques, visualizing alignment with basic tools, evenly applying glue, and verifying post-application, you can achieve optimal results. Follow our comprehensive Glue Laminated Beam Installation Guide for seamless and structurally sound connections every time.